
1. Jekyll이란?
- Jekyll은 Templates, partials, liquid code, markdown 등과 같은 동적 구성 요소에서 정적 웹 사이트를 구축하는 데 사용되는 Ruby 기반의 Parsing Engine
- Jekyll은 Parsing Engine으로 컨텐츠 제공하지 않으며, 템플릿이나 디자인 요소도 없음.(직접 만들어야 함)
- Jekyll은 정적 웹사이트를 제공함. -> 동적 X
- 각 요청에 대해 컨텐츠, 템플릿 및 태그를 구문 분석 작업을 미리 한 번 수행하고 전체 웹사이트를 폴더에 캐시하여 정적으로 제공함.
- Github pages에서 무료로 호스팅 할 수 있음.
2. Jekyll 설치 방법
1) Ruby 설치
- Jekyll은 Ruby 기반이므로 Ruby 개발환경이 필요함.
- Ruby는 각 운영체제별로 설치 방법이 다르므로 주의
- 필자는 Windows로 Window 설치 방법을 사용
1-1) 설치 파일 다운로드
- 윈도우 OS의 경우 Ruby와 Devkit(개발툴킷)을 별도로 설치해줘야하므로, Ruby 설치 홈페이지 에서 Devkit이 포함된 버전 다운로드
- 필자의 경우 현 시점에서 가장 최신 버전인 Ruby+Devkit3.1.1-1(x64) 다운로드
- 해당 설치 파일 실행 후 Next만 눌러 모두 Default 값으로 설치하면 됨.
1-2) 기본 세팅
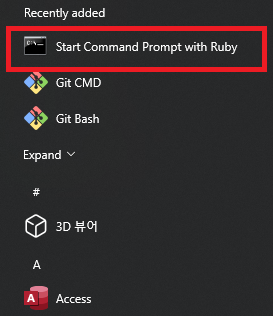
- 아래 그림과 같이 윈도우 시작 창에서
Start Command Prompt with Ruby를 실행
- 실행 후 가장 먼저 프롬프트에서 인코딩을 부여하기 위한 명령어로
chcp 65001실행Active code page: 65001 -
위와 같은 결과가 나오면 완료
bundler설치하기gem install bundler- 위의 code를 통해
bundler를 설치할 수 있음. -
bundler는 Ruby App이 사용하는 gem의 dependecy를 관리하여 Ruby App 개발을 위한 일관된 환경을 제공할 수 있다.
- 실행
bundle exec jekyll serve - 위 명령어로 Jekyll 실행이 가능함
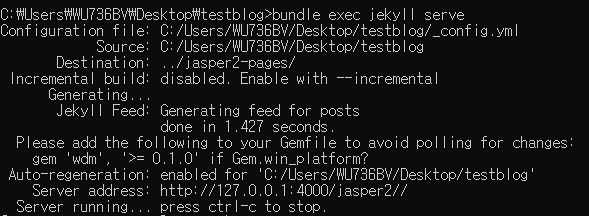
- 이와 같은 메시지가 나오면 정상 작동 완료
127.0.0.1:4000/jasper2//로 접속하면 테마 페이지 확인 가능- 터미널에서
Ctrl + C를 누르면 Terminate 가능
1-3) 추가 설치
- 필자의 경우 현 시점 가장 최신 환경인 Ruby 3.x 버전으로 설치하여 실행시 오류가 발생함.
- 최신 버전으로 Ruby를 설치하여 실행하시는 분들을 위해 아래에 발생한 오류와 해결 방법을 공유합니다.
3. 오류 해결
Error 1) Could not locate Gemfile
- 현 Theme에서는 Gemfile이 포함되어 있어 오류 발생하지 않았지만, 이전 Theme에서 Gemfile이 포함되지 않아 오류가 발생한 경우가 있었음.
- 해결
- bundle 관련 명령문을 실행했을 때,
Could not locate Gemfile와 같은 결과가 나오고 설치가 안된다면 Gemfile init을 해주어야 함.bundle init - 위와 같은 명령문으로 GEMFILE 생성 가능
Error 2) cannot load such file -- webrick
- Jekyll 실행 후에 가장 먼저 맞닥뜨린 오류
C:/Ruby31-x64/lib/ruby/gems/3.1.0/gems/jekyll-3.9.0/lib/jekyll/commands/serve/servlet.rb:3:in `require': cannot load such file -- webrick (LoadError) from C:/Ruby31-x64/lib/ruby/gems/3.1.0/gems/jekyll-3.9.0/lib/jekyll/commands/serve/servlet.rb:3:in `<top (required)>' from C:/Ruby31-x64/lib/ruby/gems/3.1.0/gems/jekyll-3.9.0/lib/jekyll/commands/serve.rb:184:in `require_relative' from C:/Ruby31-x64/lib/ruby/gems/3.1.0/gems/jekyll-3.9.0/lib/jekyll/commands/serve.rb:184:in `setup' from C:/Ruby31-x64/lib/ruby/gems/3.1.0/gems/jekyll-3.9.0/lib/jekyll/commands/serve.rb:102:in `process' from C:/Ruby31-x64/lib/ruby/gems/3.1.0/gems/jekyll-3.9.0/lib/jekyll/commands/serve.rb:93:in `block in start' from C:/Ruby31-x64/lib/ruby/gems/3.1.0/gems/jekyll-3.9.0/lib/jekyll/commands/serve.rb:93:in `each' from C:/Ruby31-x64/lib/ruby/gems/3.1.0/gems/jekyll-3.9.0/lib/jekyll/commands/serve.rb:93:in `start' from C:/Ruby31-x64/lib/ruby/gems/3.1.0/gems/jekyll-3.9.0/lib/jekyll/commands/serve.rb:75:in `block (2 levels) in init_with_program' from C:/Ruby31-x64/lib/ruby/gems/3.1.0/gems/mercenary-0.3.6/lib/mercenary/command.rb:220:in `block in execute' from C:/Ruby31-x64/lib/ruby/gems/3.1.0/gems/mercenary-0.3.6/lib/mercenary/command.rb:220:in `each' from C:/Ruby31-x64/lib/ruby/gems/3.1.0/gems/mercenary-0.3.6/lib/mercenary/command.rb:220:in `execute' from C:/Ruby31-x64/lib/ruby/gems/3.1.0/gems/mercenary-0.3.6/lib/mercenary/program.rb:42:in `go' from C:/Ruby31-x64/lib/ruby/gems/3.1.0/gems/mercenary-0.3.6/lib/mercenary.rb:19:in `program' from C:/Ruby31-x64/lib/ruby/gems/3.1.0/gems/jekyll-3.9.0/exe/jekyll:15:in `<top (required)>' from C:/Ruby31-x64/bin/jekyll:25:in `load' from C:/Ruby31-x64/bin/jekyll:25:in `<main>' - 위와 같은 오류가 발생하여 당황했지만, 읽어보니 LoadError로 Webrick을 로드할 수 없다는 내용이었음.
- Ruby 3.x 버전부터 webrick이 빠진 채 설치된다고 함.
- 해결
bundle add webrick
- 위와 같은 명령어로 webrick을 추가 설치 해줘야지 사용 가능
Error 3) cannot load kram-parser-gfm
- Error 2와 동일한 이유로 kram-parser-gfm도 추가 설치해주어야 함.
- 해결
bundle add kramdown-parser-gfm
- 위와 같은 명령어로 kramdown-parser-gfm을 추가 설치하여 해결
- 기타
- 위와 같이 추가 라이브러리를 설치하고 Gemfile을 확인하면 해당 라이브러리들이 아래와 같이 자동으로 추가되는 것을 알 수 있다.
gem "webrick", "~> 1.7" gem "kramdown-parser-gfm", "~> 1.1" - 해당 Gemfile을 통해 Dependency를 관리할 수 있다.
- 다른 폴더에서
bundle install을 통해 Gemfile의 내용을 자동으로 설치할 수 있다.
3. 마무리
- Github Blog 첫 도전을 위해 Jekyll과 Ruby 설치에 대해 공부하였다.
- 아직 완벽하게 개념이 정립되지는 않지만, 지속적으로 관리하며 블로그를 다듬어봐야겠다.